

 |
 |
 |
 |
 |
| China Paint Tips | by Jean Nordquist | |
| Making tiny hooks for fastenings | from China-Dolls.co.uk | |
| Making hand-sewn hook bars or button loops | from China-Dolls.co.uk | |
| Buttonhole and Blanket Stitch | from Save the Stitches by Nordic Needle | |
| Top 7 Ways to Ruin Your Dolls | by Denise Van Patten (About.com) | |
| General Principles of Doll Conservation | by Denise Van Patten (About.com) | |
Making tiny hooks for dolls clothes
It may seem more convenient to use poppers to fasten little doll clothes, but apart from the lack of authenticity they often produce a result that is too bulky and not very satisfactory. Buttons can look delightful but you need to ensure not only that you can obtain buttons that are small enough for your purpose but that your sewing is up to stitching the buttonholes neatly. I like to use buttons (or ties) on underwear but unless buttons are part of the decoration, I prefer to use hooks.
I avoided hooks for a long time because even the smallest commercially available hooks were too bulky. However one day while putting together a tiny (1 inch) all-bisque doll I had the idea of making my own hooks. I took the thin gold wire which I use for attaching the limbs, cut off about an inch* (1) and bent it completed in half (2 and 3)). I then curled up the wire ends (4) using jewellers pliers; at this stage make sure you keep the hook flat as possible, working in two-dimensions. Finally, bend the top of the loop over to make your hook (5 and 6).
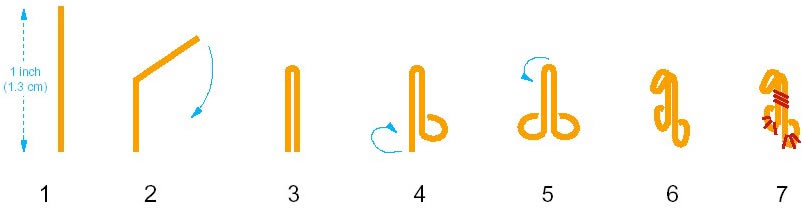
You can attach the hooks to the fabric in 3 places: at each curl, and across the shank (7). Then make your fabric bar as usual. Even if your sewing technique is not perfect, none of it is on full display on the finished dress. And best of all, once the hook is engaged you can press the hook flatter, as the wire is fairly soft. It means the hook grips securely, has a neat finish without bulk, and is perfectly fine if you need to unhook it in the future.
*Obviously you can choose to make your hook larger or smaller, but this seems an optimum size for the thickness of wire. If you use thinner wire the hooks may not be strong enough and if you want to make larger hooks, then maybe normal commercially available hooks would be suitable (and less labour intensive).
![]()
Making hand-sewn hook bars or button loops
Any hand sewing technique improves with practice. Just like in sporting events, even when you are skilled, you should "limber up" by doing a little practice work before beginning on the real thing. However to some extent you can practise on the bars for hooks, which are not visible on the outside of the garment, and save your best work for the button loops.
To begin with, do not use too long a piece of thread, as it will tangle while you are working. Deciding on the right length might be tricky; try between 14 and 20 inches as a starting point. To assist with anti-knotting you can use the least expensive option which is spit, or a commercial anti-knotting agent used by quilters such as Thread Heaven®. Then, for example, to try out a button loop, take a scrap piece of material, fold the edge over and create a firm crease; this represents the edge of the garment where you will form your loop. Mark on the edge the exact width of the button you are using. Secure the thread at one of the marks, by inserting the needle about half an inch from the left hand mark and bringing the needle out exactly on the fold at the mark, then oversewing a tiny stitch and pulling firmly tight. Then insert the needle in the fold at the second mark on the right, leaving a small loop with some slack to allow the button to pass comfortably through it; secure the thread at the second mark. You can insert the needle back and forth left and right until you have four bars of thread to work over*. Using buttonhole stitch , work your way over the whole loop until you have completely covered it. Finish off by inserting the needle in the second mark and bringing the needle out of the fabric about half an inch away from this second mark. Cut the thread at this point.
Buttonhole stitch is distinguished from blanket stitch by twisting the thread such that a small knot is produced when the stitch is pulled tight. Insert the needle into the loop (or bar) wind the thread emerging from the eye of the needle around the tip of the needle in the direction in which you are working. Pull the thread tight and repeat the process. The diagrams show your working from left to right.
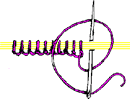
Blanket stitch is worked in a similar manner but does not have a knotted ridge. Insert the needle into the loop and wind the end of the thread emerging from the work on the loop around the tip of the needle and pull tight. Either method of working over the loop is acceptable (as long as you are consistent); I favour buttonhole stitch.
And finally - if you completely mess up on the real garment, you can easily remove the whole loop or bar by cutting it off neatly - and begin again. This is not true of buttonholes themselves, as removing stitches tends to degrade the frayed fabric edge which you are neatening.
*If you are working a hook bar, you are working on a flat fabric surface and may over sew, (in the position of your finished bar), three or four lines of thread about a quarter of an inch in length. You will then oversew these threads as for the button loop.
![]()